

‘Maximum effort’ to ‘soften up’ the Rhine
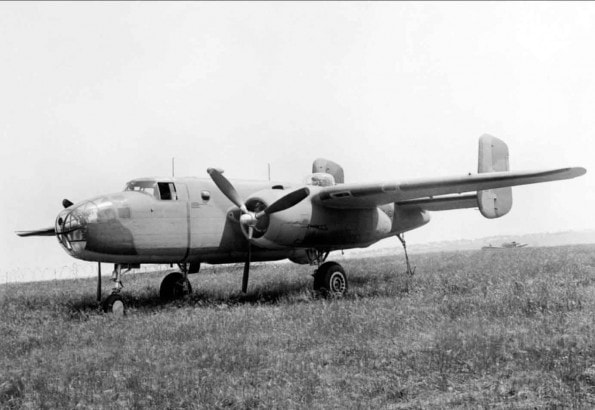
North American B-25B Mitchell Mk I, FK161, the first Mitchell to be delivered to RAF Bomber Command, summer 1942. (Top Left)
Boston Mark III, AL775 ‘RH-D’, of No. 88 Squadron RAF based at Attlebridge, Norfolk, in flight. (Top Right)
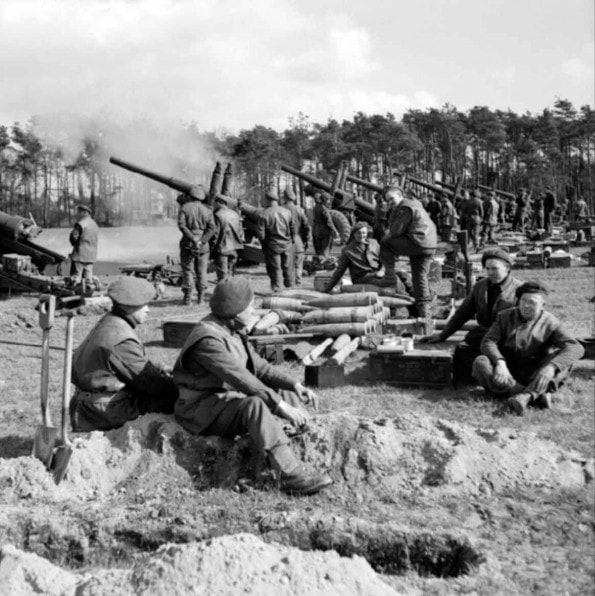
The 5.5-inch guns of 235 and 336 Medium Batteries, Royal Artillery, fire in support of the Rhine crossing, 21 March 1945. (Bottom Left)
Royal Artillery 7.2-inch howitzers being brought up to fire in support of the Rhine crossing, 21 March 1945. (Bottom Right)
With the Allies on the banks of the Rhine it was obvious to the Germans that they faced an amphibious assault and probably an airborne assault in the near future. They should have been in a strong position, having had a long time to prepare defences in depth. Yet their Ardennes offensive, the Battle of the Bulge, had taken a heavy toll on their last remaining reserves.
Then the surprise survival of the bridge at Remagen had served to unbalance their forces. Hitler had been desperate to close down the bridgehead at Remagen and had drawn off reserves that could have been vital to the anticipated vulnerable areas elsewhere on the Rhine.
With near complete air superiority the Allied bombers were now pounding the German positions. The role of the medium bombers, a sometimes neglected aspect of the bomber war, was as vital as ever. Squadron Leader Malcohn Scott DFC, a Mitchell navigator in 180 Squadron later recalled:
For more than a week during March 1945 the Mitchells and Bostons of 2 Group had been pounding targets in the Rhineland in close support of the 21st Army Group fighting its way to the great river barrier. Some 22,000 British, Canadian and American casualties had been suffered in clearing the area between the Maas and the Rhine.
Xanten, one of 2 Group ’s earlier targets and more recently the recipient of a devastating night raid by Bomber Command, was now occupied by British and Canadian troops. The last strong bastion of the German troops on the west side had fallen and within a few days the rest of the territory was cleared and the Allied armies stood on the west bank looking at the remains of the Wesel bridge blown up by the retreating Germans.
For the six squadrons of 137 and 139 Wings in 2 Group the targets now shifted to the east side of the Rhine. At least two, occasionally three, raids were made each day on marshalling yards, communication centres and bridges, oil dumps, billeting areas and barracks, artillery emplacements and troop concentrations. Some penetrations were deeper to important rail centres but mostly attacks were concentrated in the Weser-Emmerich-Munster area where Plunder, the code name for the overall operation covering the Rhine crossing, was to take place.
Maximum effort had been ordered and quite often up to fifteen aircraft per squadron took part instead of the usual dozen aircraft in two boxes of six.
Montgomery’s preparations for the Rhine crossing were, as always, massive and painstaking: troops being ferried to the rear echelons to practise ‘boat drill’ and the handling of small craft up and down the muddy banks of the River Maas at night in preparation for the real thing.
There could be no misleading or attempted feints this time. Within a mile or two, the Germans could estimate where the Allied crossing would be made. As Kesselring wrote, ‘The enemy’s operations in a clearly limited area, bombing raids on headquarters and the smoke-screening and assembly of bridging materials, indicated their intention to attack between Emmerich and Dinslaken with the point of the main effort on either side of Rees.’ The only questions facing the enemy was when and how?
Always before, the Allies had launched a parachute and glider attack as a prelude to the full force of the main assault. Kesselring could but wait to see where the paras dropped, or so he thought. In the meantime, RAF medium bombers and Typhoons and the 9th AF Marauders and Thunderbolts carried on with their now familiar role of ‘softening up’ the area around the chosen points of the great river and the hinterland of the proposed bridgeheads on the east bank.
One important road and rail junction town and troop-billeting area was Bocholt, which became the object of almost daily attacks and quickly gained a reputation for providing a very warm reception. On 18 March it was bombed and again two days later. We all got back but with our aircraft and a few aircrew heavily peppered by shrapnel.
The next morning, 21 March, Bocholt was again listed as the target. On the bombing run No. 1 in the box was badly damaged and an air gunner’s leg was almost shot away but the pilot retained control and made an emergency landing at Eindhoven. No. 2 in the box received a direct hit as the bombs fell away and virtually disintegrated, taking down No. 3, an all-Australian crew, from which one parachute was seen to emerge. This belonged to an air gunner who although captured on landing was freed eight days later by advancing British troops. The pilot of No. 4 was severely injured, shrapnel smashing through his right thigh bone but he managed to retain consciousness long enough to get his aircraft back over friendly territory after bombing, before passing out. The mid-upper gunner then took over the controls and managed under the pilot’s guidance to crash land at the first airfield en route without further casualties.
The leading aircraft of the second box was seriously damaged by flak, wounding an air gunner but the pilot pressed on, bombed and led his formation back over the Rhine before breaking away to force land at Eindhoven. Bocholt deserved its thick red ring on the map as a place to be avoided if possible!
Of the twelve 180 Squadron Mitchells that had left Melsbroek earlier only seven returned to base, all with varying degrees of flak damage and some with wounded aboard.
This account appears in Martin Bowman(ed): The Reich Intruders: Dramatic RAF Medium Bomber Raids Over Europe in World War Two.
http://ww2today.com/
North American B-25B Mitchell Mk I, FK161, the first Mitchell to be delivered to RAF Bomber Command, summer 1942. (Top Left)
Boston Mark III, AL775 ‘RH-D’, of No. 88 Squadron RAF based at Attlebridge, Norfolk, in flight. (Top Right)
The 5.5-inch guns of 235 and 336 Medium Batteries, Royal Artillery, fire in support of the Rhine crossing, 21 March 1945. (Bottom Left)
Royal Artillery 7.2-inch howitzers being brought up to fire in support of the Rhine crossing, 21 March 1945. (Bottom Right)
With the Allies on the banks of the Rhine it was obvious to the Germans that they faced an amphibious assault and probably an airborne assault in the near future. They should have been in a strong position, having had a long time to prepare defences in depth. Yet their Ardennes offensive, the Battle of the Bulge, had taken a heavy toll on their last remaining reserves.
Then the surprise survival of the bridge at Remagen had served to unbalance their forces. Hitler had been desperate to close down the bridgehead at Remagen and had drawn off reserves that could have been vital to the anticipated vulnerable areas elsewhere on the Rhine.
With near complete air superiority the Allied bombers were now pounding the German positions. The role of the medium bombers, a sometimes neglected aspect of the bomber war, was as vital as ever. Squadron Leader Malcohn Scott DFC, a Mitchell navigator in 180 Squadron later recalled:
For more than a week during March 1945 the Mitchells and Bostons of 2 Group had been pounding targets in the Rhineland in close support of the 21st Army Group fighting its way to the great river barrier. Some 22,000 British, Canadian and American casualties had been suffered in clearing the area between the Maas and the Rhine.
Xanten, one of 2 Group ’s earlier targets and more recently the recipient of a devastating night raid by Bomber Command, was now occupied by British and Canadian troops. The last strong bastion of the German troops on the west side had fallen and within a few days the rest of the territory was cleared and the Allied armies stood on the west bank looking at the remains of the Wesel bridge blown up by the retreating Germans.
For the six squadrons of 137 and 139 Wings in 2 Group the targets now shifted to the east side of the Rhine. At least two, occasionally three, raids were made each day on marshalling yards, communication centres and bridges, oil dumps, billeting areas and barracks, artillery emplacements and troop concentrations. Some penetrations were deeper to important rail centres but mostly attacks were concentrated in the Weser-Emmerich-Munster area where Plunder, the code name for the overall operation covering the Rhine crossing, was to take place.
Maximum effort had been ordered and quite often up to fifteen aircraft per squadron took part instead of the usual dozen aircraft in two boxes of six.
Montgomery’s preparations for the Rhine crossing were, as always, massive and painstaking: troops being ferried to the rear echelons to practise ‘boat drill’ and the handling of small craft up and down the muddy banks of the River Maas at night in preparation for the real thing.
There could be no misleading or attempted feints this time. Within a mile or two, the Germans could estimate where the Allied crossing would be made. As Kesselring wrote, ‘The enemy’s operations in a clearly limited area, bombing raids on headquarters and the smoke-screening and assembly of bridging materials, indicated their intention to attack between Emmerich and Dinslaken with the point of the main effort on either side of Rees.’ The only questions facing the enemy was when and how?
Always before, the Allies had launched a parachute and glider attack as a prelude to the full force of the main assault. Kesselring could but wait to see where the paras dropped, or so he thought. In the meantime, RAF medium bombers and Typhoons and the 9th AF Marauders and Thunderbolts carried on with their now familiar role of ‘softening up’ the area around the chosen points of the great river and the hinterland of the proposed bridgeheads on the east bank.
One important road and rail junction town and troop-billeting area was Bocholt, which became the object of almost daily attacks and quickly gained a reputation for providing a very warm reception. On 18 March it was bombed and again two days later. We all got back but with our aircraft and a few aircrew heavily peppered by shrapnel.
The next morning, 21 March, Bocholt was again listed as the target. On the bombing run No. 1 in the box was badly damaged and an air gunner’s leg was almost shot away but the pilot retained control and made an emergency landing at Eindhoven. No. 2 in the box received a direct hit as the bombs fell away and virtually disintegrated, taking down No. 3, an all-Australian crew, from which one parachute was seen to emerge. This belonged to an air gunner who although captured on landing was freed eight days later by advancing British troops. The pilot of No. 4 was severely injured, shrapnel smashing through his right thigh bone but he managed to retain consciousness long enough to get his aircraft back over friendly territory after bombing, before passing out. The mid-upper gunner then took over the controls and managed under the pilot’s guidance to crash land at the first airfield en route without further casualties.
The leading aircraft of the second box was seriously damaged by flak, wounding an air gunner but the pilot pressed on, bombed and led his formation back over the Rhine before breaking away to force land at Eindhoven. Bocholt deserved its thick red ring on the map as a place to be avoided if possible!
Of the twelve 180 Squadron Mitchells that had left Melsbroek earlier only seven returned to base, all with varying degrees of flak damage and some with wounded aboard.
This account appears in Martin Bowman(ed): The Reich Intruders: Dramatic RAF Medium Bomber Raids Over Europe in World War Two.
http://ww2today.com/
 RSS Feed
